BLOG / HOW TO
How to Remove a Popcorn Ceiling: A Complete Step-by-Step Guide
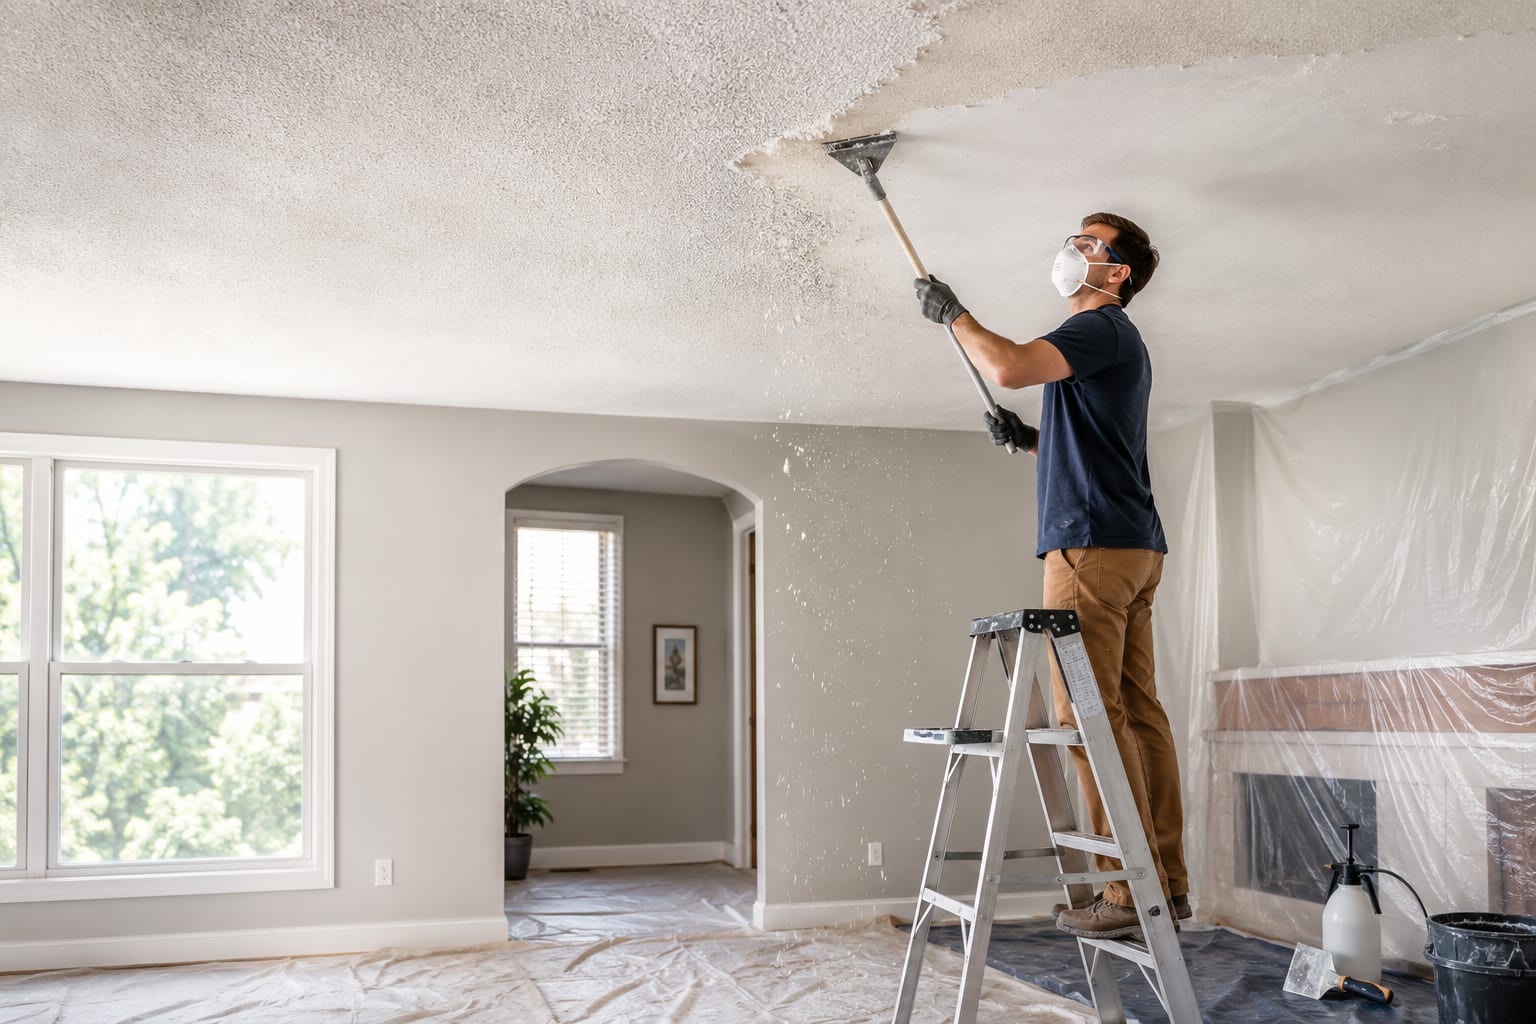
Popcorn ceilings had their moment. From the 1950s through the late 1990s, builders sprayed that bumpy, cottage-cheese-like texture onto millions of homes because it was cheap, hid drywall seams, and dampened sound between floors. Today it just makes a room look dated, traps dust and cobwebs, and can quietly knock thousands off your home's resale value. The good news is that removing a popcorn ceiling is one of the more approachable DIY renovation projects, as long as you respect the process and the safety steps.
This guide walks through exactly how to remove a popcorn ceiling from testing to final paint coat, including the dustless method, the easiest way to scrape popcorn ceiling texture, the best tools for the job, and what to do with all the debris once you're done.
What Is a Popcorn Ceiling, and Why Was It So Popular?
A popcorn ceiling, sometimes called an acoustic ceiling or stucco ceiling, is a textured spray-on finish made from a mix of paint or joint compound and a bulking agent such as polystyrene, vermiculite, or in older homes, asbestos fibers. Contractors loved it because a single spray pass could cover an entire ceiling in minutes, hiding taping flaws and uneven seams without the labor-intensive job of skim coating and sanding a perfectly flat surface.
The texture also muffled noise, which made it a favorite in apartments and split-level homes. Once design trends shifted toward clean, minimalist interiors and concerns about asbestos content grew, popcorn ceilings fell out of favor almost as fast as they spread.
Before You Start: Test for Asbestos and Lead
This is the step you cannot skip. If your home was built before 1980, there's a real chance your popcorn ceiling contains asbestos, and homes painted before 1978 may have lead paint layered over the texture. Scraping a ceiling that contains asbestos releases microscopic fibers into the air, and inhaling them is linked to serious long-term lung disease.
Here's how to check before you touch a scraper:
- Buy an inexpensive asbestos test kit from a hardware store, or better yet, send a small sample to a certified lab for accurate results.
- Lightly mist a small section of ceiling and scrape a one-inch sample into a sealed bag for testing.
- Wait for confirmed results before doing any further work.
If the test comes back positive, stop the DIY project immediately and call a licensed asbestos abatement contractor. Removing asbestos yourself is not just risky, it's illegal in many jurisdictions outside of strict guidelines. If your ceiling tests clean, you're good to move forward with the steps below.
Tools and Supplies You'll Need
Having the right gear on hand before you start makes the entire project faster and far less frustrating. Here's what experienced renovators rely on:
- A wide, flexible ceiling scraper or putty knife (10-12 inches works best for open areas)
- A pole-mounted popcorn ceiling scraper for vaulted or hard-to-reach ceilings
- A pump garden sprayer or spray bottle for misting water
- Plastic sheeting and painter's tape to seal off walls, floors, and fixtures
- A sturdy ladder or rolling scaffold
- 120- and 220-grit sandpaper or a sanding sponge
- Joint compound and a 6-inch drywall knife for patching
- Primer and ceiling paint for the final finish
- A respirator-rated dust mask, safety goggles, and old long sleeves
If you're shopping for these supplies, most big box retailers including Home Depot stock dedicated popcorn ceiling scraper kits that bundle the blade, extension pole, and a built-in debris bag, which cuts down significantly on mess.
Step-by-Step: How to Remove a Popcorn Ceiling
Step 1: Clear and Protect the Room
Remove furniture, rugs, and decor wherever possible. Anything too heavy to move should be pushed to the center of the room and fully covered with plastic sheeting. Tape plastic along the wall-ceiling joint so falling debris doesn't streak your walls, and lay drop cloths across the entire floor, overlapping the seams. Switch off power to ceiling fixtures at the breaker, then remove light fixtures, vents, and ceiling fans, or wrap them tightly in plastic if they can't come down.
Step 2: Wet the Ceiling in Small Sections
Dry scraping a popcorn ceiling is slow, dusty, and far more likely to gouge the drywall underneath. Working in roughly four-foot sections, use a garden sprayer to mist warm water evenly across the texture. Let it sit for 10 to 20 minutes so the moisture fully penetrates the material. You'll know it's ready when the texture looks slightly darker and feels soft to the touch. Avoid soaking the ceiling, since excess water can saturate the drywall paper and cause it to bubble or tear.
Step 3: Scrape the Popcorn Off
This is the core of the project and, for most homeowners, the easiest way to scrape a popcorn ceiling once the texture has softened. Hold your scraper at a low angle, almost flat against the ceiling, and push forward with steady, even pressure rather than digging in at a sharp angle. Working flat reduces the risk of gouging the drywall face. Clear one damp section completely before moving on and re-wetting the next.
For ceilings that were painted over at some point, the paint layer seals out moisture, so wetting alone won't soften the texture. In that case, lightly score the surface with a wire brush or use a specialty popcorn ceiling paint stripper to break the seal first.
Step 4: Try the Dustless Method for an Easier Cleanup
If airborne dust is your biggest concern, the dustless popcorn ceiling removal approach skips dry sanding almost entirely by keeping the material wet and wrapped throughout removal. The process is nearly identical to the wet-scrape method above, but with two extra habits:
- Keep a spray bottle within arm's reach at all times and re-mist any section that starts to dry out mid-scrape, since dry popcorn crumbles into fine airborne particles.
- Use a scraper with an attached collection bag so debris falls directly into the bag instead of onto the floor.
This method won't eliminate dust completely, but it dramatically cuts down on what becomes airborne, which matters most if you're working in an occupied home or have anyone with respiratory sensitivities nearby.
Step 5: Patch, Sand, and Smooth the Surface
Once the texture is off and the ceiling has dried for 24 to 48 hours, you'll likely see nail pops, seams, or small gouges from scraping. Skim a thin layer of joint compound over any imperfections with a drywall knife, let it dry fully, then sand it smooth using 120-grit sandpaper followed by a finer 220-grit pass for an even surface. A pole sander makes this step far less taxing on your neck and shoulders.
Step 6: Prime and Paint
Wipe the ceiling down with a slightly damp cloth to remove sanding dust, then apply a quality ceiling primer with a roller. Primer seals the patched areas so they don't flash through the topcoat. Once it's dry, roll on two coats of flat ceiling paint for a clean, even, modern finish.
How to Remove Popcorn Texture Along Walls and Corners
Ceiling edges require more control than open areas. Aggressive scraping can chip wall paint, damage drywall tape, or tear the paper surface.
Use the following method:
- Protect the top of the wall with painter’s tape and plastic.
- Mist the edge lightly, avoiding excessive runoff down the wall.
- Use a smaller plastic putty knife rather than a wide metal blade.
- If the ceiling has been painted together with the wall, carefully score the joint with a utility knife before scraping.
- Push the scraper toward the center of the ceiling rather than into the wall.
- Use a damp sponge to remove small remaining particles after the main texture has been scraped away.
Use additional caution around crown molding. If the molding is staying in place, score the paint line first so removing the texture does not peel away the molding’s finish.
How to Remove a Painted Popcorn Ceiling
Painted popcorn ceilings are more difficult because the paint prevents water from soaking into the texture. Repeatedly spraying more water usually increases the risk of drywall damage without solving the problem.
Start by testing several areas. If water remains on the surface after 10 to 15 minutes, consider these options:
Carefully scrape the high points
Remove only the loose and raised texture without digging into the drywall. The remaining surface can then be skim-coated to produce a smooth finish.
Use a manufacturer-approved texture-removal product
Some products are designed to penetrate painted ceiling texture. Follow the label’s ventilation, protective-equipment, dwell-time, and cleanup instructions. Test the product in a small area before using it across the ceiling.
Skim coat over the texture
After removing loose material and high spots, a drywall professional can apply thin coats of joint compound over the ceiling. This may be more practical than trying to remove every painted particle.
Cover the existing ceiling
Installing new drywall over the old ceiling creates a clean surface without scraping the texture. This reduces removal mess but adds weight, slightly lowers the ceiling, and requires fixtures and electrical boxes to be adjusted correctly.
Do not sand, drill, score, or scrape a painted ceiling until asbestos and lead-related risks have been addressed.
Best Tools to Remove a Popcorn Ceiling
If you only invest in a few tools for this project, prioritize these:
- A flexible, wide drywall scraper with rounded corners to avoid gouging.
- A pole-extension scraper for ceilings over 8 feet or vaulted spaces, which saves your neck and back from hours of looking straight up.
- A pump garden sprayer instead of a basic spray bottle, since it covers more ceiling area per pass and maintains consistent pressure.
- A shop vacuum with a HEPA filter for cleanup, which captures fine particles that a regular vacuum or broom would just push back into the air.
Read More: How Much Does Popcorn Ceiling Removal Cost
Removing Popcorn Ceiling and Refinishing: What to Expect Afterward
Once the texture is gone, most homeowners choose one of three finishes: a smooth, flat ceiling, a subtle skip-trowel texture, or a knockdown texture that hides minor imperfections without going back to the heavy popcorn look. A completely smooth ceiling shows every flaw under direct light, so if your drywall has a lot of seams or uneven joints, a light knockdown texture during refinishing can actually save you sanding time while still looking far more modern than popcorn ever did.
Budget extra time for refinishing if your ceiling was textured to hide poor original drywall work, since this is common in older homes and apartments built quickly during the popcorn ceiling boom.
How to Get Rid of a Stucco Ceiling That Won't Cooperate
Sometimes a textured or stucco-style ceiling resists the standard wet-scrape method entirely, usually because of heavy paint buildup or a denser original mix. If you've tested a section and water simply isn't penetrating after multiple mistings, you have two realistic options. Apply a dedicated chemical texture stripper formulated for ceilings, following the ventilation and safety instructions on the label closely, or cover the ceiling entirely with a thin layer of new drywall or a skim coat rather than fighting the existing texture. Covering is often the better call for ceilings with confirmed asbestos that can't be safely scraped, since it seals the material in place without disturbing it.
DIY vs. Hiring a Professional
This project is genuinely doable as a weekend DIY job for a single room, especially if your popcorn ceiling isn't painted and tests clean for asbestos. Where it gets harder is scale. Vaulted ceilings, multiple rooms, or large open-concept living areas turn a weekend project into a multi-week one, and the physical toll of scraping overhead for hours adds up fast.
Professional popcorn ceiling removal typically runs anywhere from a few hundred dollars for a single small room to several thousand for a whole-house job, depending on square footage, ceiling height, and whether asbestos abatement is involved. If your time is limited or your ceilings are large, hiring it out often makes more financial sense than the cost of your own weekends.
Cleanup: The Part Most Guides Skip
Here's what almost nobody mentions in popcorn ceiling tutorials: the cleanup is its own project. A single room generates surprising amounts of wet, sludgy debris, soaked plastic sheeting, and bags of scraped material, and a multi-room job can easily fill a pickup truck bed or more. Wet popcorn debris is heavy, messy, and most curbside trash pickups won't take large volumes of construction waste at once.
Once your ceiling is scraped, patched, and painted, you're left with torn-down plastic sheeting, old light fixtures, leftover joint compound buckets, and bags of dried popcorn debris that need to go somewhere. Rather than making multiple dump runs in your own vehicle, a same-day household junk removal pickup can clear all of it in one visit, which is especially useful if you're tackling several rooms back to back. For larger whole-home renovation projects that involve more than just ceiling debris, a full property cleanout service can handle everything from old fixtures to leftover construction materials in a single sweep. Curious what's actually allowed in the truck, including drywall scraps and renovation debris? Check the full list of accepted items before you book.
Common Mistakes to Avoid
- Skipping the asbestos test. Even newer-looking homes can have older ceiling layers underneath later renovations.
- Over-wetting the ceiling. Saturated drywall can sag, tear, or develop mold if it doesn't dry properly.
- Scraping at a sharp angle. This is the number one cause of gouges that require extra patching work later.
- Forgetting ventilation. Open windows and run a fan to keep air moving and dust from settling into every corner of the room.
- Underestimating debris volume. A single 12x12 room can produce several heavy bags of wet scraped material, so plan disposal before you start, not after.
End Note
Removing a popcorn ceiling rewards patience more than skill. Test first, work in small wet sections, keep your scraper flat, and budget real time for patching and painting. Do that, and you'll end up with a ceiling that actually looks like it belongs in 2026, not 1985. And when the dust finally settles, leave the hauling to someone else, WeCycle can clear out the debris so your newly finished room feels done, not still mid-renovation.
Frequently Asked Questions
How long does it take to remove a popcorn ceiling?
A single average-sized room typically takes 4 to 8 hours including prep, scraping, and initial drying time. Add another day for patching, sanding, and painting.
Can I remove a popcorn ceiling myself if it has asbestos?
No. If testing confirms asbestos, the job needs a certified abatement contractor. Disturbing asbestos fibers without proper containment is a genuine health hazard.
What is the easiest way to scrape a popcorn ceiling?
Working in small, evenly misted sections with a wide, flat scraper held at a low angle is consistently the easiest and cleanest approach. Rushing or working dry almost always leads to more sanding and patching later.
Do I need to remove popcorn ceiling before selling my home?
Not always, but it can help. Buyers increasingly view popcorn ceilings as a sign of an outdated home, and a smooth, modern ceiling can support a stronger asking price in many markets.
What do I do with all the debris afterward?
Bag dried debris for standard trash where allowed, or schedule a junk removal pickup for larger volumes. If the renovation extends beyond just the ceiling, a bundled cleanout service is usually faster than hauling it yourself.
Can I use vinegar to remove a popcorn ceiling?
Plain warm water is normally the best starting point for an unpainted, water-soluble ceiling texture. Vinegar is generally unnecessary and may introduce odor or affect nearby finishes. Always test a small area rather than adding household chemicals automatically.
Should I use a plastic or metal scraper?
A plastic scraper is more forgiving and less likely to damage softened drywall paper. A wide metal drywall knife can work faster but requires better angle and pressure control. Beginners should test with a plastic tool first.
Should I turn off the HVAC during popcorn ceiling removal?
Yes. Turning the system off and sealing room vents helps prevent dust from circulating into other parts of the home. After cleanup, inspect or replace the HVAC filter before normal operation resumes.
Sabbir Kabir is a content manager at WeCycle with over 5 years of experience in creating content about junk removal services, eco-friendly waste disposal, and sustainable recycling practices. Passionate about promoting environmental responsibility, Sabbir shares actionable insights to help homeowners and businesses adopt greener, cleaner waste management solutions.
Read our latest blog posts


Need junk gone fast? See pricing in your area
Enter your zip code to see if Wecycle operates in your location.